Mar 30, 2009

I've never been so excited to change a diaper!!!

Seriously, I couldn't wait until Owen crapped so I could change him in public with my cute new wipe case and diaper carrier!!


You've probably all seen these, I have to admit the first time I heard of this I thought it was a little strange, they are wipes you know. But when I got to pick out my own fabric and customize it for my little tyke and green purse, I had fun!!

This is so simple. The wipes need no sewing at all. You just cut out fabric, hot glue it over some batting and cover with a cute decorative rope or ribbon. Then you can decorate the top however you want-ribbon, bows, flowers, buttons etc.

The diaper case is EASY sewing. I have the coordinating stripe fabric on the inside of this, so I decided to put it on the back of the wipe case as well. You can add a little ribbon or bow on this too. There's velcro on the top flap. The only thing I would do different next time is use a little heavier fabric. This seems to get all bent up in my purse. Not that it really matters...they're diapers!

I wish you all could have seen my husbands face when I told him what my friends and I were getting together to make! Priceless. But even he admits now that they are very cute. Well, maybe he didn't use the word cute...

Mar 17, 2009

Hooter Hider


I can't take all the credit for this one, we did it as an enrichment sewing class. But I did all the hard labor (okay, it was really easy) and I'm proud of it. My hooters stay very hidden when I nurse now!

Mar 15, 2009

Just so everyone knows, this is an open, public blog, so YOU ARE ALL WELCOME to visit! Don't be afraid to leave comments even if I don't know you. I love making new blogger buddies. :)

Mar 12, 2009

I CAN'T STOP!!
I think I'm a little addicted to making hairbows for my little girl! I don't even fix her hair that often, but I just can't stop! One of my friends showed me some fun ways to tie, and now I'm having fun putting different colors and patterns together. I seriously had to put away the ribbons and glue the other night at 1:00 in the morning so that I would be forced to stop! Now I need to make a bow holder...next project!
Getting a little organized...and hungry

For an enrichment activity we covered tin boxes to put cards in. I didn't have one, but really wanted to go to craft night, so I took my old recipe box to cover! I just used stuff I already had from my scrapbook supplies, some mod-podge and ribbons I had.

I even covered up the old dividers with all coordinating papers.
The hard part came later when I actually had to go through old recipes and rewrite some and throw some away. I can't believe the difference it made. I am LOVING my newly organized recipe box! Maybe I'll even cook more now :)
I still need to print off my labels for each "category" of food and then probably mod-podge the whole divider. I just ran out of printer ink!

Mar 11, 2009

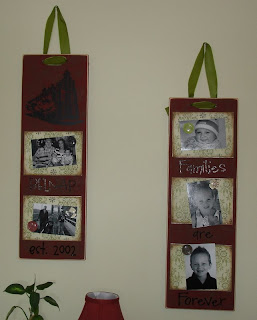
Families Are Forever


Another project with the same idea from enrichment activity. I made this one to coordinate with our living room decor (red and brown paint with green ribbon and paper). There is a vinyl, Logan Temple at the top, you can't see very well because of the glare. Each metal square is covered in scrapbook paper, distressed. It says: Belnap, est. 2002 and families are forever. There's room for a picture of each kid and 2 family ones. This picture doesn't do it justice, the boards are cuter in real life.
For each child in the house...


the first letter in their name to put above their bed.


I made the E for an enrichment activity, came home and made a matching O for the other one.

Then of course Lucy wanted a girly one for her room too!
Enrichment Activity Left-overs


I was in charge of this project for our super activity. I had some supplies left over so I bought what I needed to finish off some more boards for us to enjoy at home!
Kids Bedrooms
The whole room is filled with handmade projects
(there's a lot more on the other walls that you can't see in the picture)

We did the bed, shelves, dressers, wall decor and of course wall paint.

This wall deserves some hard core recognition. The whole room is done in those stripes and finished off with some chair rail molding. It was very labor intensive...and totally worth it!! Pretty much everything in her room is homemade too (except the curtains).
Aaahh yes, the cutest rag quilt ever.
(I can say that right?)

For my little princess, Lucy. It matches her bedroom perfectly.

It's the first one I've ever made. I did different textures of fabric (even though some don't fray) and a solid brown on the back and around the border.
Now if only I had the time and motivation, I would make one for my other kids....
Do you have the time?


This is an older project, but I still get asked all the time if we made it. We needed something LARGE to fill up this empty wall when we first moved in. So Greg and I made this out of plywood, crackle paint and a clock mechanism from Roberts. I finished it off with some hand painted roman numerals and voila...a very large clock!

Mar 9, 2009

Oldies but goodies...
Mostly baby blankets I've made. I like to keep pictures of them so I can refer back when I need a gift idea.

For sweet little Sadie

matching burp cloth and of course the card that went with it.

I think my all time favorite. I LOVE the soft fabric on the back. Not the easiest to sew though!

Another one for Owen

For Leann's baby, Luke

My carseat cover for Owen! So easy to make and it works SO wonderfully! You just lay the blanket over the top (under the handle) and tie those ribbons around the handle and the blanket can flip up over the top when you need to get in there to get the sweet (or screaming one) out!

I can't take all the credit for this one. My sweet little boy wanted to make a blanket for his new baby brother. He picked out the fleece by himself. I helped him cut some of the strips and taught him how to tie a knot. He did 2 of the sides and they look great! Nothing like brotherly love.